Monday, December 19, 2011

Broccoli Cheddar Soup - Panera Style

Living so far away from the conveniences of America, we sometimes have to come up with substitutes for the things we like and miss.  For instance, this year’s live Christmas tree was replaced by a fake one.  We tried the real ones that were sold last year, but when we brought it home it was dead.  Sagging branches.  Brown needles.  Major fire hazard. Dead.  So when the store had a 90% off sale the week after Christmas, we jumped on the fake tree wagon and went FULL TILT ARTIFICIAL with this bad dog…..
Geez.  I hope I don't scare people away from my blog by posting that!  I can't get a good picture of it no matter how hard I try. I promise it looks much much better in real life.
Another thing I miss about America is the food.  Although I don’t need it, I dream of things like Olive Garden and Chik-fil-A.  Back in the states I would be a mad-woman shopping right now.  We would go to Panera Bread I’m sure, because it is right across the street from Target. (Oh Target I miss you too!)   I would get the Broccoli Cheddar Soup in a sour dough bread bowl and I would be happy.  I deserve to be happy right?
So I caved, and I made Broccoli Cheddar Soup.  I resist the copy-cat recipes because really????  Is that copy-cat Iced Lemon Pound cake really as good as a cup of coffee with your BFF and the REAL Starbucks pound cake?  I think not.  But recipe was good.  Very very good. 
Now if only I knew how to make sourdough bread bowls.
Broccoli Cheddar Soup – Panera Style
Recipe adapted from www.myblessedlife.net

Ingredients:
  • 2 T. Butter, melted
  • 1 large onion, chopped
  • 1/2 c. butter, melted
  • 1/2 c. all purpose flour
  • 4 c. half and half
  • 4 c. chicken broth
  • 1 lb. fresh broccoli
  • 2 cups, julienned carrots
  • salt and pepper, to taste
  • 1/2 t. nutmeg
  • 16 oz. sharp cheddar cheese, grated
Saute onion in butter. Set aside. Whisk butter and flour over medium heat for 3-5 minutes. Stir constantly and slowly add half and half. Add chicken stock, still whisking.
Simmer 20 minutes.  Do not cover! (Only say this because I might have covered it, tried to start some laundry…..until I heard frying sounds and saw smoke coming from the kitchen!)
Add broccoli, carrots and onion. Cook over low heat until veggies are tender – about 20-25 minutes. Add salt and pepper. The soup will have thickened by now.
Carefully transfer soup mixture to blender and puree. Return soup to pot (or crockpot) over low heat. Add cheese. Stir until well blended. Add nutmeg right before serving.
Makes 8-10 servings.
Enjoy!


Home Stories A2Z

Friday, December 16, 2011

Yesterday I Got My Craft On

I used to be really really crafty.  I say “used” to be, because all of my stamps, scrapbooking supplies, beads, paint, glitter and more are all in storage…….in Texas.  Since moving to Japan I now only have one small cupboard allotted for craft storage, and Hobby Lobby has yet to become an international sensation.

Lucky for me, I have a few friends who, despite the lack of space, have Modge Podge, acrylic paint, and sparkly embossing powder, oozing out of their windows.  AND they are nice enough to share. Plus….this is hard for me to say….they are much more creative and crafty then I will ever be.
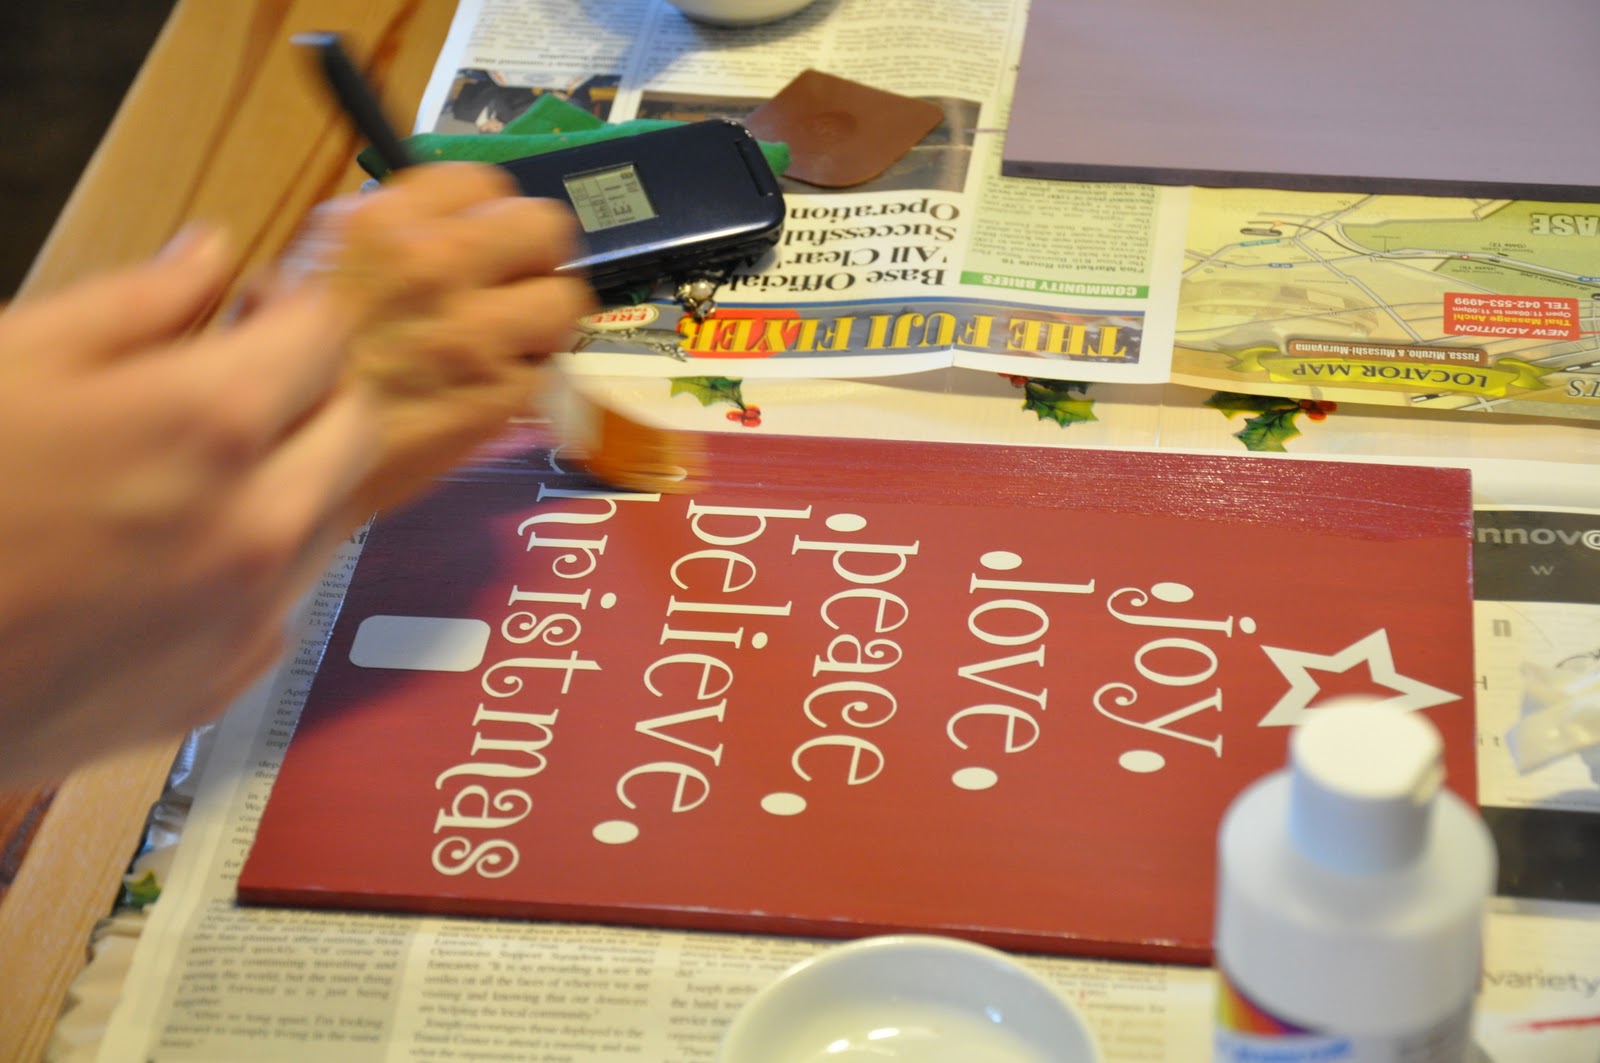
Yesterday our culture group and these super crafty creative ladies, got together for our Christmas party.  We made these……


Wonderful don’t you think?

To make one you will need:
·        A piece of wood. (Size depends on what size your letters are.)
·        Acrylic paint (any color you love)
·        Die cut letters (the crafters had a die cut machine)
·        Transfer paper (so your letters stick to the board)
·        Some glossy varnish ( just in case you hang it outside)
·        Glue gun
·        Pretty wired Christmas ribbon
First, paint the wood on the edges and one side.  Any color will do.  I chose red, but one of the Japanese ladies chose a pale purple and it was lovely.  You may need to do several coats depending how porous your wood is.


Once it is dried, attach your letters to the transfer paper.


Place the transfer paper sticky side down on your painted board, and rub the letters firmly with a scraper.


Gently peel back the transfer paper to reveal the letters sticking neatly on your board.


Cover the sides and edges with a coat of varnish.


Glue on a Christmas ribbon to the back with a glue gun.  We used a 2 ½ inch wired ribbon cut into two lengths.  Again, the size/length of your ribbon will depend on the size of your board.  Tie in a bow.  


All finished!  Now now you have a cute and easy Christmas hanging.  The Japanese ladies LOVED theirs!


And I love mine too!


Linking With:


Monday, December 12, 2011

Reindeer Poo and Grinch Pills

Because my two oldest girlies are in middle school this year, they each have seven or eight teachers.  My normal go-to gift of a Barnes and Nobles gift card multiplied by sixteen, just isn’t going to fly financially…….no matter how much of Santa’s magical reindeer dust I use.

The girls are old enough to understand that presents cost money, but they are also old enough that they really enjoy giving their teachers a little something.  So, via ideas from Pinterest, the girlies got a little crafty and made their teachers and friends Reindeer Poop and Grinch Pills!


For the Reindeer Poop (found on Blooming Where I'm Planted) Abbey made her own toppers and filled cellophane bags with Whoppers candy. 

The poem reads,

Santa looked at his list.
He even checked it twice.
And he did find out,
You haven't been too nice.
Since coal is so expensive,
Here's the inside scoop....
Santa is filling your stocking,
With lots of Reindeer Poop.

She added a “thumbprint” reindeer head, drew on the antlers and eyes, and stuck a pom-pom nose on with a glue gun, and stuck on a Santa sticker.


Cute huh?

Allie sort of thought the poop was gross, so she went with the Grinch Pills.


We found this idea on Custom Creations by Tamera Bennett but we couldn’t find green Tic-Tacs in Japan so we improvised with Eclipse gum.   Allie made a simple card to stick on the cover and tied it with shiny red curling ribbon.  (Right click on the image and save, to print your own.)
 
Both girls stuck a To/From tag on the bag of their little treats and the projects were complete!


Merry Christmas everyone, from the Three Girlies!  Abbey, Allison, and Amber!


Linking with:


Thursday, December 8, 2011

Twisted Christmas

It is finally that time of year.  The time when I have so much to do, that I can’t even find one minute to enjoy sparkling lights, hot cocoa in front of a warm fire, and the cheerful laughter of my family.  It might help if my family’s laughter wasn’t a product of my latest Christmas recipe disaster.  (See Gingerbread Nightmare from last year)  Oh yeah, and we actually don’t have a fireplace.

This year I decided to try Homemade Candy Canes.  (Insert scary music here….like Friday the 13th or Jaws.)

Why I decided to do this, I’m not sure.  Candy Canes are something like 99 cents a box for twelve, right?  Out of the entire recipe I made three barely presentable canes and maybe seven twisted candy stumps.


Don’t make fun of my pictures.  These three took me over an hour to stir, cool, roll, and twist.

Just in case you want to torture yourself like I did, I am including the recipe from my 1951 cookbook.  If you figure them out, let me know, because although they are a labor of sick, twisted, demented, love, they taste really really good.  I am almost tempted to try again.......after Santa picks me up in his sleigh, takes me to the North Pole, and Mrs. Santa serves me Mint Bailey’s and coffee while the elves give me a pedicure, in front of the warm fire in Santa’s lodge.  By the way, this is one of Santa's elves.....


Peppermint Candy Canes
Ingredients:

·        2 cups sugar
·        ½ cup light corn syrup
·        ½ cup water
·        ¼ tsp cream of tartar
·        ¾ teaspoons peppermint extract
·        1 tsp red food coloring

Combine sugar, corn syrup, water and cream of tartar in a saucepan; stir until sugar dissolves.  Cook on med-high without stirring until very hard ball stage is reached.  (265F on your candy thermometer)  Remove from stove and add peppermint.  Pour one portion on a buttered cookie sheet.  Add food coloring to other portion, stir, and pour onto a second buttered cookie sheet.  When cool enough to handle, pull each part separately.  Form into ropes and twist red part around the white.  Cut into 8 inch lengths and form into the shape of a cane.  Makes 10 canes.

Linking with:


Wednesday, November 16, 2011

6th Grade Humor At Its Finest

For some reason I get a big kick out of finding the Japanglish on signs, while living here in Japan.  This is actually not very nice of me because EVERY Japanese person I have met here speaks very good English compared to my Japanese.  So I totally deserve it if they are all snickering behind my back. 
Still, I can’t help it, and I continue to snap pictures of any funny translation of Japanese into English.  It makes me laugh.
The other day I had the pleasure of being a chaperone on the 6th Grade Field trip to Ueno Zoo in Tokyo, Japan.  (That is, if you count four hours on a school bus with 60 some 11ish year olds pleasurable.) Turns out, they dig the Japanglish as much as I do and we had a blast hunting some interesting signs down.
First was at the polar bear exhibit.  

The kids walked around for the next two hours saying, “Hey, did you drop your thing?”
Of course, toilet humor is always fun for pre-teens and this sign was hanging underneath the tree where the sloth was allowed to climb over the crowd.

Poop = Good Times
Finally, and I can’t even say this is Japanglish, but this sign outshined even the giant pandas and the baby gorillas….

What sixth grader can resist the opportunity to use a swear word in their zoo field trip summary?  I don’t think there was a kid in my group who didn’t write about these guys.
Again…Good times.

Allie and Kaylie at Ueno Zoo – Tokyo, Japan
November 15th, 2011

Thursday, November 3, 2011

Baked French Toast - Breakfast for Swimming Champions

It’s no secret that I am SUPER proud of my two oldest girlies and the fantastically awesome effort they put forth for the Yokota Stingrays swim team.  But I am also SUPER excited to announce that my youngest girlie had the chance to swim this past weekend at our home swim meet.  Yay Amber!!!!

She swam the 50 meter back stroke in one minute and twenty-two seconds, and although she didn’t win any medals or ribbons, she was just excited to swim……

Just like her big sisters do.

And since the girls burn about a zillion calories during a swim meet, I have to carb load them with something yummy for breakfast.  It is fast and easy and you can make A LOT if you need to.
 This recipe works well with any kind of bread, but a nice French bread or sourdough is perfect if you want to be fancy.  I am not feeling that fancy at 5:30am, making sure everyone has swim caps and goggles, so this time I just used a left over baguette from dinner the night before.  It made perfect little dippers.  (Normally though, I use Wonder Bread…like a bad mom…who doesn’t make her kids eat whole wheat bread like I should.)
Baked French Toast
(recipe adapted from http://www.cooks.com/)
Ingredients:
·        1/4 cup butter
·        4 eggs
·        2/3 cup milk
·        1/3 cup sugar
·        1 tsp cinnamon
·        8 slices of bread (more or less depending on the kind of bread)
Turn oven to 400 degrees.  Melt butter in a 10 x 15 pan while the oven is pre-heating.  Mix sugar and cinnamon.  Remove pan from the oven and sprinkle sugar cinnamon mixture evenly into the pan.  Mix the eggs and milk.  Dip the bread into the liquid mixture and then lay it on top of the buttery sugar.  Bake for 10 to 15 minutes, until bread begins to brown. (I usually go about 15.)  Lift out sugar side up onto a serving platter.  Serve with warm maple syrup and powdered sugar…or whatever French toast toppings you love!
Then, you better go swimming to work those calories off!


Sharing this recipe with:


The 36th Avenue