Showing posts with label condiments. Show all posts

Saturday, February 11, 2012

Pan Roasted Almonds

A kitchen really isn’t a kitchen without a little plastic tub of these hanging around.  Pan Roasted Almonds.  Sprinkle them over a salad.   Mix them with your chicken salad.  Munch on them as a little snack.  And oh yeah…..a can of green beans and these!  Suddenly, you are a chef!  You made Green Beans Almondine!  And this also makes you an expert in French cooking……I think?

Let me warn you though.  There is a fine line between French chef and filling your entire home with your personal Yankee Candle scent…..Burning Almond.  DON’T go folding your laundry while you have these babies on the stove.  Okay?

Pan Roasted Almonds

Ingredients:
  • Sliced almonds
  • Lawry’s seasoned salt (or any salt of your choice)
  • Olive oil…about 2 tsps

Put one or 2 teaspoons of olive oil in a pan.  Add almonds.  How much oil you use is up to you, but remember…you can always add more if you need to.  


Turn heat to medium low.  Stir almonds until almost all are browned.  Remove almonds from heat and cool.  Store in an airtight container for up to two weeks.  (I HIGHLY doubt they will last that long.)

Here they are in my Raspberry Almond Chicken Salad.  Yummo!!!


Sunday, November 28, 2010

Turkey & Garlic Bread Sandwiches with Caesar Spread....Rockin' Those Leftovers!

What’s better than sliced bread?  Sliced bread with garlic, butter, and herbs, toasted to a golden brown of course.  Unfortunately, the Pepperidge Farm Texas Toast box already made that statement clearly on the back of their packaging, and so I had to come up with something better.  So what is better than sliced bread with garlic butter and herbs on it?  An entire sandwich made with the buttery herby bread goodness!    What’s even better than that?  You can use your leftover turkey from Thanksgiving to make this AMAZING sandwich!!! 
Turkey & Garlic Bread Sandwiches with Caesar Spread
 

 Ingredients:
·        1 package frozen Texas toast (8 slices)
·        Leftover turkey from thanksgiving or fresh deli turkey
·        ¼ cup mayonnaise
·        ¼ cup grated parmesan cheese
·        1 tablespoon lemon juice
·        1 teaspoon Dijon mustard
·        1 clove garlic crushed
·        Lettuce and tomato
Obviously, I used the Pepperidge Farm Texas Toast (aaaah…yumm!) for my sandwiches.  Bake the bread according to package directions.  I actually baked them a tad bit longer to make them crispier.

   While the bread is baking mix the mayo, parmesan, lemon juice, Dijon mustard, and garlic for your Caesar spread.  This might be a great time to teach your kids the snobby Grey Poupon commercial.  They will roll their eyes at first, but ever so gradually they will catch on to the humor of it.
After the bread is cooled, put together your sandwiches.  Spread each slice with the Caesar mixture, then add the turkey, tomato, and lettuce.
These sandwiches turned out awesome!  You know when you start to debate with yourself… “I think we should throw out some of these leftovers….” and you know you should make turkey stock or soup or whatever and you just want to puke thinking of turkey?  Well, you need to make these.  They are the same sandwiches you would eat inside the Grey Poupon limousine.  Enjoy!

I am linking to these sites....


UndertheTableandDreaming
Keeping It Simple
Its So Very Cheri

Monday, November 22, 2010

Sweet-n-Spicy Garlic Dill Pickles

Sweet –n- Spicy is such a good combination, don’t you think?  My husband makes the coffee every night so all I have to do in the morning, when I am not the most pleasant person, is flip on the switch.  Awwwww…..he’s so sweet.  He also takes my CENSORED and he CENSORED it as he CENSORED CENSORED CENSORED me in bed.  Oooooh….SPICY!
Not only is he a sweet-n-spicy guy but he likes to eat sweet-n-spicy food.  For instance I might make him an egg sandwich for breakfast and he will put salt, pepper, grape jelly, and Tabasco sauce on it.  Don’t knock it until you try it.  I can say that because he force fed me once.  Anyway, he likes this pickle recipe and since there are three jars of it in the refrigerator he’ll probably put them on his egg sandwich this morning.
Sweet-n-Spicy Garlic Dill Pickles
 
·        One 16 ounce jar dill pickle slices
·        2 cups of sugar
·        ½ to 1 Tablespoon hot pepper sauce (I use Cholula)
·        5 pressed garlic cloves or 2 teaspoons chopped garlic
·        ¼ teaspoon red pepper flakes
Pour ALL of the ingredients in a bowl.  Usually, I make several jars at a time, like five for us and one to give away.  (I can eat a jar of these a day.)
Other recipes call for much less sugar, like just a half of cup.  This is bad.  Don’t make those.  Make mine.  Also, use Cholula hot sauce and not Tabasco sauce like other recipes say.  This is very bad also.  People will not like your pickles if you use Tabasco sauce.  Just make mine.
Where was I?  Oh yes, put all the ingredients in a bowl. (Save the pickle jars because you are going to use them later.) It is okay if you used the garlic from a jar.  Fresh is good, but there is so much sweet and spice going on you won’t be able to tell.  Just don’t use garlic powder....blech!
Now stir the mixture all together until the sugar is mostly dissolved.  Cover with plastic wrap and chill for 24 hours.  You may want to stir them occasionally if you think of it, but sometimes I forget and they still turn out fine.  Be sure you taste one if you stir it, so you can get an exciting sneak peek of flavor!
Next, take them out of the refrigerator and fill the jars with pickles.  Once the pickles hit right before the rims, pour in the juice.  For some reason I always have a few pickles that I can’t get back into the jars.  It is important that you leave some room for some juice though, so just eat those extra pickles yourself. 
Here’s a little FYI for you.  Re-jarring the pickles gets a kinda messy.  You will want to rinse the jars off after you put the lids back on.  Just in case you don’t know this, when you rinse things off they get wet.   When wet they can be slippery.  When you drop a slippery jar of pickles on your kitchen floor it will break and you will have a sticky, filled with glass shard, catastrophe on your hands.  I am not saying this happened to me, but it might have.

Your pickles are ready to store, eat, or give away after the lids are secured.  If you are going to give them away however, you might want to jazz them up.  It will make your friends feel special.  I decorated mine with a sort of fall harvest theme for Thanksgiving.  I know that I should have fancied up the lids also…..but there isn’t a Hobby Lobby within about 4000 miles of me.  Hope you like my pickles!


A few blogs I follow.....
Keeping It Simple
DIY Club
Sumo Sweet Stuff
Punkin Seed Productions

Friday, November 19, 2010

Salsa With a Little Bit of Trash...I Mean Class!

After cleaning up the breakfast dishes this morning I came to the conclusion that I get no joy out of cleaning my kitchen anymore.  Come on…..someone surely understands what I mean.  Like a master architect you fit everything into the dishwasher.  The inside of the microwave is as sterile as an operating room.  The counter is smooth and your Grandma’s old cookie jar stands proudly on display filled with your homemade goodies.  You got all the baked on, caked on, burned on, stuff off of your casserole dish and tiny remaining bubbles pop softly in the sink.  You stand and admire your masterpiece finishing off the last few sips of red wine, in the soft glow of the light from the oven hood.  Romantic huh?  Well, not when you share your kitchen with the washer and dryer like I have to.
Oh it gets better.  Here's my ENTIRE kitchen....
Anyway, I miss my HUGE lovely kitchen in Texas and I had to mope to my husband about my new(old) kitchen here in Japan….and guess what?  No sympathy from the man whatsoever.  He just said, “Honey, you can choose to have a good day or a bad day over this.” (By the way, we say this to our 7 year old.)  I had to just sulk away.  How could a man ever understand the dishonor and mortification I can potentially face in the blogging community with my pathetic little ugly kitchen?  I was feeling like total kitchen trash and was about to cry when Amber(7) said, “Hey mom!  I like Japan!” and handed me a picture of Mt. Fuji that she had drawn.
 I gave her a hug and stuck it on my sparkling clean white refrigerator.  Looking around (no wine in sight), the bright November sun highlighting the washer and dryer (in case you forgot...they are IN my kitchen), I felt joy.
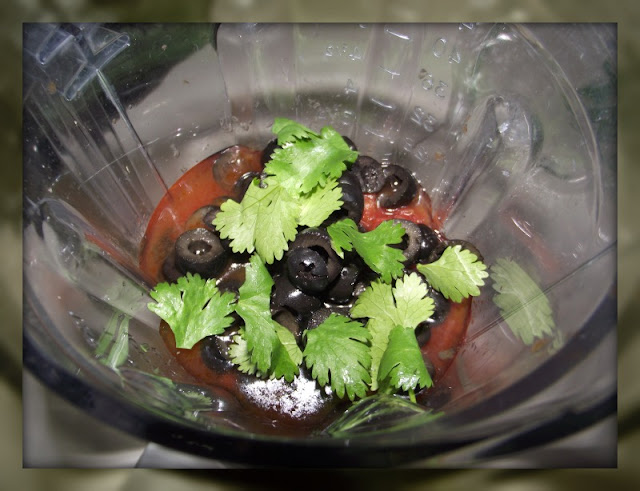
You might think that is the end.  Like I am soooo grateful for all my blessings blah, blah, blah…..but no.  The joy and romance created in the story above quickly dissipated as a pulled out the blender to make salsa for taco night.  You see, I don’t have a red and chrome fancy Oster.  I have this to match the washer and dryer in my kitchen……
So, in my trashy kitchen with my trashy blender I bring you my famous homemade salsa recipe. 

Lynnie's Salsa


Ingredients:
·        1 can Original Rotel tomatoes
·        1 can diced tomato with garlic and onion
·        1 small can sliced black olives drained
·        About 10 leaves of fresh cilantro
·        2 teaspoons garlic salt
·        5 to 10 “shakes” of Cholula hot sauce
Okay, this is hard.  Put this all in a blender. 
  You can adjust the amount of cilantro and Cholula to your desired taste.  10 “shakes” of the hot sauce makes a medium salsa.  Now, press “liquefy” for a about 20 seconds.    If you must have chunky salsa you can just stir everything in a bowl and let sit, but I don’t do chunky.  The salsa really gets good flavor after it sits in the refrigerator for a couple of hours.  But remember, we are being “trashy” here.  So, when your husband yells from the sofa, “Woman! I need some chips and salsa for the game…the boys will be here in 5!”…..you can whip this up.


Did I mention that my washer and dryer are IN my kitchen???