Showing posts with label dinner. Show all posts

Monday, March 19, 2012

Dijon Maple Chicken

Chicken.  Chicken. Chicken.  We eat a lot of chicken at my house.  Lately though, it has been getting a bit blah.  I want TASTE and ZIP and ZING! 

I am also a busy mom though, who doesn’t have time to get kids’ homework finished, fold the laundry, drive to swim team, AND make a fabulous new dish every freaking night of the week.
No I am not bitter…….just tired of food.  Food is such a pain in the ass. Buying it, putting it away, fixing it, cleaning it up, storing it, and loading & unloading the dishwasher……3x a day!  
Oh yeah, and then there is the planning and trying be healthy.  Gah!  I am so tired of food.  When I lamented my woes to my husband, his reply was, “But honey, you are keeping me alive.”
Okay, I guess food is good for something.  And now……back to chicken.
I found this recipe torn out of a magazine.  (I am not sure which one, but the article mentions a Trader Joe’s Cookbook.)  It was easy, and had ZINGtastik flavor.  The clean-up would have also been easy, if I would have remembered to non-stick spray the pan.
Dijon Maple Chicken
(The pictures are just so so.  Remember, I am tired.) 


Ingredients:
·        6 boneless skinless chicken thighs with the fat trimmed off
·        ½ cup Dijon mustard
·        ¼ cup maple syrup
·        1 Tablespoon white wine vinegar(I think white vinegar would do also)
·        Salt and pepper
Preheat your oven to 450 degrees.  Spray a baking dish with non-stick cooking spray.  Place chicken thighs in baking dish and sprinkle with salt and pepper.  In a small bowl, combine mustard, syrup, and vinegar.  Pour over the chicken thighs.  Turn the thighs in the dish so they get all saucy.  It should look like this...
Place the dish in the oven for 40 minutes, basting with the sauce after the first 20 minutes.  Remove chicken from oven and let it sit for a few minutes so it’s not boiling.  Baste the chicken with the sauce when serving.  Serve with rice or pasta and veggies.
The flavor of the chicken is more mustardy than maple-like…….savory and oh so tender.  Leftovers are great diced up and tossed into a salad.
Now go and non-stick-spray your baking dish so you don’t have to scrape it out the next morning, like I do.

Saturday, February 11, 2012

Raspberry Almond Chicken Salad

I am not very good at coming up with my own recipes.  Almost all of my recipes come from a hand-me down from a friend or an auntie, or I skip around the internet and find them on other blogs.  Something I can figure out though, is how to improve a recipe.  I just add some bacon or double the chocolate.
Another thing I have a hard time with is coming up with “healthier” versions of the things I love.  My Twitter profile says, “I run so I can eat pie for breakfast”, and I am totally not kidding.
So lately, I have been trying to come up with my own recipes and have also been trying to be a bit healthier.  It’s rare, but this is a recipe I came up with myself.   It’s no bacon and double chocolate celebration for your taste buds, but it’s pretty good and good for you too.
Raspberry Almond Chicken Salad

Ingredients: 
·        Shredded chicken (I use the chicken in a can)
·        ½ cup fresh raspberries
·        Toasted sliced almonds that are lightly salted
Concentrate here.  This is hard.  Put all the ingredients in a bowl and stir it together.  Fill up a whole wheat pita pocket or serve on lettuce or whole grain bread.    


Yes, this is it and no I don’t really have any measurements for you.  If you force me, I will say use one small can of chicken (maybe one shredded chicken breast), eye the ½ cup raspberries, and maybe about a Tablespoonish of the toasted almonds.
Here is my toasted almond recipe which you should always have on hand for salads and snacks. Toasted Almonds
Lastly, if you want people to take a bite, and exclaim with joy, “OMG, you have to give me this recipe!”…..just add some mayo and serve it on flakey  croissant. 


Sunday, August 14, 2011

Spicy Honey Grilled Chicken

What can I say?  It’s summer and my wonderful husband has made a zen oasis out of our backyard.   Daily, I am being called out to our back porch to relax, have a beer, and grill.
Okay, that’s not really our backyard.  It’s a picture I took in Kyoto, Japan of the Shogun's backyard.  But our backyard is practically as nice…..after a beer or two….and I love it. 
I have also fallen in love with boneless, skinless, chicken thighs (the ones in the giant plastic bag in the freezer section).  I’ve always been a little snobby about my chicken.  I usually only buy breasts, and only use the fresh ones.  But, when our grocery stopped getting shipments of fresh chicken for awhile, I was forced to buy the bulk frozen chicken. 
The recipe mentions that you can use breasts but PROMISES that it will be better with the thighs.  I caved and bought some dumb thighs. To my surprise, the thighs were much juicier and tender than the breasts.   
Yay for thighs!  You beat out breasts any day!
Spicy Honey Grilled Chicken
(Recipe adapted from Our Best Bites….those girls rock!!!)

Ingredients:
·        2 tsp garlic powder
·        2 tsp chili powder
·        ½ tsp onion powder
·        ½ tsp coriander
·        1 tsp kosher salt or sea salt
·        1 tsp cumin*
·        8 boneless/skinless chicken thighs
·        2 tsps oil (I used olive)
·        ½ cup honey
·        1 Tablespoon cider vinegar
Put all the spices in small bowl and mix together.  Next, pat the thighs dry and plop them into a big bowl.  Slather them with the oil.  Yes, I said, “oil your thighs”.  (Imagine if I would have told you to oil your breasts!)  Now toss the spices into the chicken thighs until they are coated well.  It helps if you use your hand for this.
Put the thighs on the grill for about 3-5 minutes on each side.  Warm the honey a little bit in the microwave and add the vinegar.  
Before taking the thighs off the grill, marinate each side and grill for about 1 minute longer.  Reserve a couple of tablespoons of the marinade and drizzle it over the chicken after you have taken it off the grill.
Mmmmmmmmmm.   It is some good grilling.  Guaranteed to change even a breast man into a thigh man..wink wink.
*Note:  This recipe is spicy, but not too spicy, but maybe too spicy for the kiddos. (Mine thought so.)  If you need to take away some spice but keep most of the flavor, simply eliminate the cumin.

I am sharing this recipe with:
This Chick Cooks

Sunday, August 7, 2011

Bacon-Wrapped Teriyaki Chicken Skewers


There are very few meals in my family that I can make that ALL FIVE people will eat.
Maybe we are weird.

I think we get it from my mom’s side of the family.

Anyway, last night I made a meal that EVERYONE loved.  Amber, who says she is a vegetarian, ate it up.  Abbey gave up her teriyaki sauce boycott for it.  Allie, decided to forgo Chip Chick for her birthday dinner, and have this instead.  Brian, was so satiated by it, he took an hour long nap after we had dinner.

Oh wait, he always does that. But still........these are AMAZING!!!! (Like most things  that are wrapped in bacon.)

Bacon-Wrapped Teriyaki Chicken Skewers
(Recipe adapted from www.ourbestbites.com)


Ingredients:
·        1 lb boneless/skinless chicken (I used breasts)
·        1 package bacon (not the thick kind)
·        1 large can pineapple chunks
·        Teriyaki sauce/glaze
·        Kebab skewers or toothpicks
1 - The easiest way to put these together is to set up a little Kebab making station.  On one plate cut the bacon into thirds.  On another plate, put the chicken cubed up into bit-sized pieces. Finally, drain the pineapple and put it into a bowl.
2 – Wrap one third slice of bacon around a chunk of chicken and secure the bacon with a skewer.  Next, add a slice of pineapple.  If you are using toothpicks, you are done.  If you have kebab skewers, repeat until the skewer is full of bacon wrapped chicken and pineapple goodness.  Lay each skewer on a rimmed cookie sheet or baking dish.
3 – After all the chicken chunks have been wrapped like little babies in bacon and skewered, brush with teriyaki sauce.  Turn over, and repeat.  Go ahead and get them extra goopy with sauce.
4 – Place the pan in the refrigerator for 2 to 4 hours.  (I only did two hours because I was too excited to get them on the grill.  Longer, can only make them better I’m sure!)
5 – Grill each skewer on low heat for about 10 minutes on each side.  (Check them after 7 minutes, just to make sure they aren’t burning.)
Baste with extra teriyaki sauce each time you turn them, plus one final baste right before you take them off the grill.  (I actually turned them over for about 2 minutes just to cook on that final baste.)
At about this time your neighbors will be peeking over the fence and smelling the deliciousness of your grilling/basting magic. 
You better double the recipe, because they are going to want some.
I promise…..there won’t be any leftovers.

Sunday, July 24, 2011

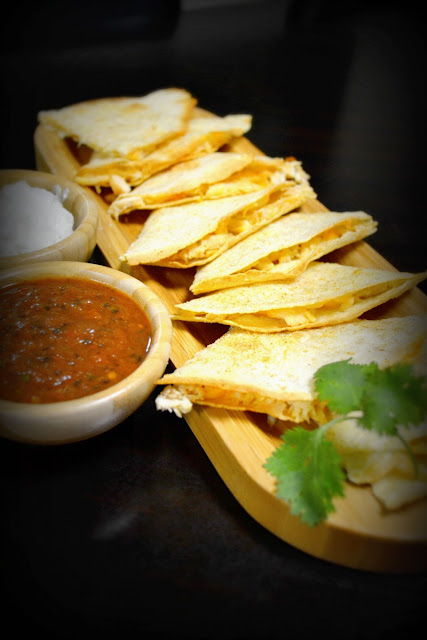
Easy Chicken Quesadillas

I think I have about 6000 pictures of food and recipe preparation stored on my hard drive.  We have our desktop looping a slideshow through those pictures, which include about a gazillion family pictures from the last eight years.  So, pictures of me trying to squeeze sausage out of its casing (maybe you don’t want to ask)…….
……end up randomly popping up along with pictures of my family.  (Aren’t we a fabulous bunch?)
When you have your Japanese culture club over for a little luncheon, they love the family pics but the sausage one....it's pretty confusing.
Anyway, I have sat on my bum for half of the afternoon going through albums labeled things like “alfredopumpkinmuffs” and “spicypicklesugarcookies”, trying to clean up my messy family slide show....and I sort of forgot about dinner.  Luckily, I had taken pictures of this easy, family pleasy meal, AND had all the ingredients.
Eons ago, I found this recipe on a chat forum for fitness.  I was trying the low-carb/high protein thing, and these were possibly what I lived on for about 3 months.  I do believe they originally called for whole wheat tortillas and fat free cheese, but blech….who wants to eat that? Not me, and definitely not my kids.  So, I tweaked it and everyone is happy.  You will be happy too, if you make them tonight.
Easy Chicken Quesadillas
 

Ingredients:
·        5oz canned chicken breast
·        4 Tortillas
·        Cheddar cheese
·        Lawry’s Seasoned Salt
·        Pam cooking spray
·        Optional Ingredients : cumin, jalapenos, onion, sour cream, salsa (make mine!) , guacamole…(whatever you like!)
Directions:  Lightly spray two tortillas with Pam cooking spray then sprinkle each with a little bit of the Lawry’s.  (If you like it a little spicier, sprinkle the cumin on in this step. 
Flip the tortillas over so they are seasoned side down.  Next, take the canned chicken and spread it evenly over the two tortillas.  Sprinkle the cheese over the chicken.  (Again if you like, you might want to add some onion or jalapenos here too.)
Place another tortilla on top of the chicken and cheese.  Spray these lightly with pam and sprinkle the Lawry’s.  Put in the oven at 425 degrees.
After about 5 to 6 minutes, take a large spatula and flip the tortillas over.  I usually do this when the tortilla starts to bubble a bit and the edges are slightly brown.  Put them back into the oven for about five minutes more, or until the tops are starting to brown and get crispy.
Cut each tortilla into 4 triangles with a pizza cutter and serve with sour cream, salsa (make sure it’s mine), guacamole, lettuce, etc.

Now if I can only get my husband to clear off all the mouth/skull/surgery pictures he has on the computer, we will be good to go for a nice and normal family slide show.

UndertheTableandDreaming
Hunk of Meat Mondays
Sumo's Sweet Stuff

Thursday, November 11, 2010

Chip Chick

Evidently I was a fairly picky eater as a child.  My grandmother still reminds me of what a picky eater I was (I am now thirty-seven), and how I created such a burden on her and my mother.  Now that I am a mother myself I apologize whole-heartedly to whoever I inconvenienced with my pickiness.  I anticipate the roar of applause as I now declare, “My middle daughter is VERY picky.”  What goes around comes around I guess.
Some moms I know will create vastly different meals for each person in their family….like my kitchen is a restaurant?  Whatever.  I say those kinds of moms need to drink more wine while they are cooking.  We have two rules in my kitchen.  #1 : If mommy doesn’t like it, it will most likely never be made. #2 : Three out of five Pentons must  like it, or it will not be made again.  My husband really doesn’t like the first rule.  It means that he never gets goulash or onion rings.  (Give me a break, I don’t like the way onions crunch in my mouth and my goulash is NEVER as good as my mother-in-law’s, so why try?).   The second rule is great though.  Who wants to make something for dinner that makes 2 out of 3 of your kids cry?  
With an ULTRA picky eater in the house it is rare to find a recipe that the whole family likes.  If I followed my daughter's lead, we would alternate spaghetti and cheese pizza every night until she went to college.  Thankfully Chip Chick has secured a spot in her cute but persnickety mouth!
In one of my all-time favorite cookbooks, “One Bite Won’t Kill You”, by Ann Hodgman, she describes Chip Chick like this….. “It’s not hard for homemade chicken fingers to be better than McNuggets, which taste like dog meat.  But this recipe is much, much better….and much, much easier than driving a cranky bunch of children to McDonald’s.”  Ahhhhh….she is so wise.


Ingedients:
·        1 ½ pounds of boneless chicken breasts or chicken tenderloins
·        1 large egg
·        ¼ cup milk
·        ¼ teaspoon pepper
·        2 6 ounce bags any-flavor potato chips.
Preheat the oven to 400 degrees and cover a cooking sheet with cooking spray.  Cut the chicken into tenders if you have the breasts or you can even do nuggets.  Beat together egg, milk, and pepper in a medium bowl.  Crush the chips.  It seems like a lot but you will need a nice deep layer of them so just do it already!  I like to make an assembly line like this….
Now flop and press the chicken in the chips until they are well coated and put them on a cookie sheet.  I did Ruffle’s Cheddar and Sour Cream and two Pringle’s JalapeƱo (for my spicy husband) on this tray.
Bake for 10 minutes.  Turn them and bake for about 10 more minutes.  They should be starting to brown.  Serve with dipping sauces…ranch, sweet-n-sour, bbq…..or your picky eater can just have ketchup.  Yuck.  Get fancy and make a Ceasar salad for the more mature paletes in your family.

Thursday, October 21, 2010

Creamy Dreamy Chicken

Creamy Chicken

Today had to be a crock pot day.  I left the house at 7:25 am and came home at 5:30pm.  Actually, that is a lie.  I came home for about ten minutes and decided I better put something in the crock pot, or we would be having Subway for the third time this week.

This recipe is wonderfully easy and delicious.  It also falls under the comfort food category because it is creamy and warm and you should probably go to the gym the day after you serve it.  I only say this because the leftovers are to die for!  You will have a giant heaping plate of it while your kids are at school and then maybe even take a nap.  Nap? Who am I kidding?

Ingredients:
·        One can cream of mushroom soup mix
·        4 to 6 boneless chicken breasts
·        1 envelope Italian dressing mix
·        Half of a cup of water
·        8 oz. cream cheese
·        Pasta noodles, rice, or baked potato

Put the soup into your crock pot and lay the chicken breasts on top.  Most people would thaw them out first but I put them in frozen solid.  If you have less than 4 hours to cook them though, you are going to have to thaw them out first.  Next add the water and the soup mix.  Put on the lid and cook for 3 to 4 hours on high, or put it on low if it will be longer.  Or put it on high and turn it down, whatever.  The longer you cook it the more fall aparty the chicken gets and fall aparty is always a good thing.

About 15 minutes before serving, take out the chicken and cut it into small pieces.  Add the cream cheese.  I usually buy the Philadelphia whipped cream cheese because it stirs in faster. Throw the chicken pieces back in and let it sit in the crock pot for about 10 more minutes so it can warm back up.  Serve over pasta, rice, or get really fancy and do baked potato.  My kids would all three gag if I got all fancy on them, so we do angel hair pasta.  Like I said, the leftovers are great…..maybe even better than the fresh batch.  This recipe is also easily doubled.


*This recipe was given to me by my wonderful friend Deanna.  She is a SUPER MOM.  When I first met her she asked me what my laundry system was.  She said she loved hearing about others’ laundry systems.  Dear Deanna, I tried to color code my baskets for each kid like you do.  They each assumed that I had purchased them a “car” to ride down the steps in.  It didn’t work.  I am now back to my old system which is simply……Deanna is so cool….she has a system.